Quantcast
Channel: Dave Pratte – Speed Academy

Want Us To Build YOUR Car? Here’s Your Chance

$
0
0

We’ve had some amazing support from an active group of fellow racers and modified car nuts on Patreon for years now, and we’ve really enjoyed getting to know this core group of fans who like our content enough to spend their hard-earned dollars on us every month. It’s truly an honor and a privilege to have people like what we do enough to voluntarily support and encourage us to keep doing what we do in this way. It’s been such a positive experience that we wanted to do something special this year to thank our patrons as well as entice some other fans who might not otherwise get involved on a membership platform like Patreon.

After kicking around a few different ideas, we settled on the Special Offer we just launched on our Patreon page yesterday (Jan. 10, 2020) that will run until February 10th (2020), where active members at the $25/month and $50/month tiers for the next 6 months are going to receive entry into a random draw, with the winner having their car given the Pimp My Ride treatment, Speed Academy style.

The plan for the build is to do something similar to the episode above, where we installed a fresh set of Konig flow formed wheels and Nitto ultra-high performance summer tires on our buddy Nam’s BRZ, as well as a set of Revel USA Touring Sports coilovers sourced from Turn14 Distribution, a Hooker Blackheart exhaust system, a Grimmspeed cold-air intake and pulley cover, and a Raceseng Apex R shift knob.

The winner has to be able to get his or her car to our shop in the Hamilton, Ontario, Canada area, so realistically this Special Offer is designed for Canadians and Americans. Our plan is to shoot a video of the build like we did with Nam’s BRZ, so you also have to be OK with appearing on camera when we reveal the car to you after we’ve modified it.

If this sounds like fun to you, then jump on over to our Patreon page and take a look at the $25 and $50 a month tiers, since those are the tiers participating in this Special Offer. If you’re already a Patron at the $10 or $15/month level, perhaps this is a good time to step up to the $25 or $50 level, with $50 patrons getting two entries in the draw while $25 patrons get one. And of course there are other Benefits of membership at these higher tiers, including a VIP (free lapping) entry to our annual Track Day Meet at Toronto Motorsports Park, an invitation to our winter shop party, discounts on our merch, and all the other benefits received at the lower membership tiers.


Continental VikingContact 7 Tire Review: A Winter Tire Wake-Up Call

$
0
0

I’ve been winter driving for a few decades now, including spending my teenage years snow drifting the mean streets of Ottawa, Ontario, Canada, one of the snowiest capital cities in the world (with an average annual snowfall of 224cm or over 7-feet), so I’ve tried just about every brand of winter tire you can think of.

One of the lessons I learned early on is that all-season tires simply cannot keep up in serious winter conditions. That said, we did recently find (see video above) that an excellent all-season tire, namely Continental’s all-season ExtremeContact DWS 06, does actually stop shorter and generated more cornering grip than a winter tire in cold but dry conditions, but I can say with absolute confidence that on any sort of slushy, snowy or icy surface the result would have been completely flipped, since I have yet to find an all-season tire that can touch a winter tire on a low grip surface. Let’s just say I’ve gotten stuck in the snow more than my fair of times on all-season tires because I was too lazy to swap on the winter wheel and tire setup before the first snow of the year, so I know from first-hand experience just how real the performance differences are between all-season and winter tires when the going gets snowy or icy.

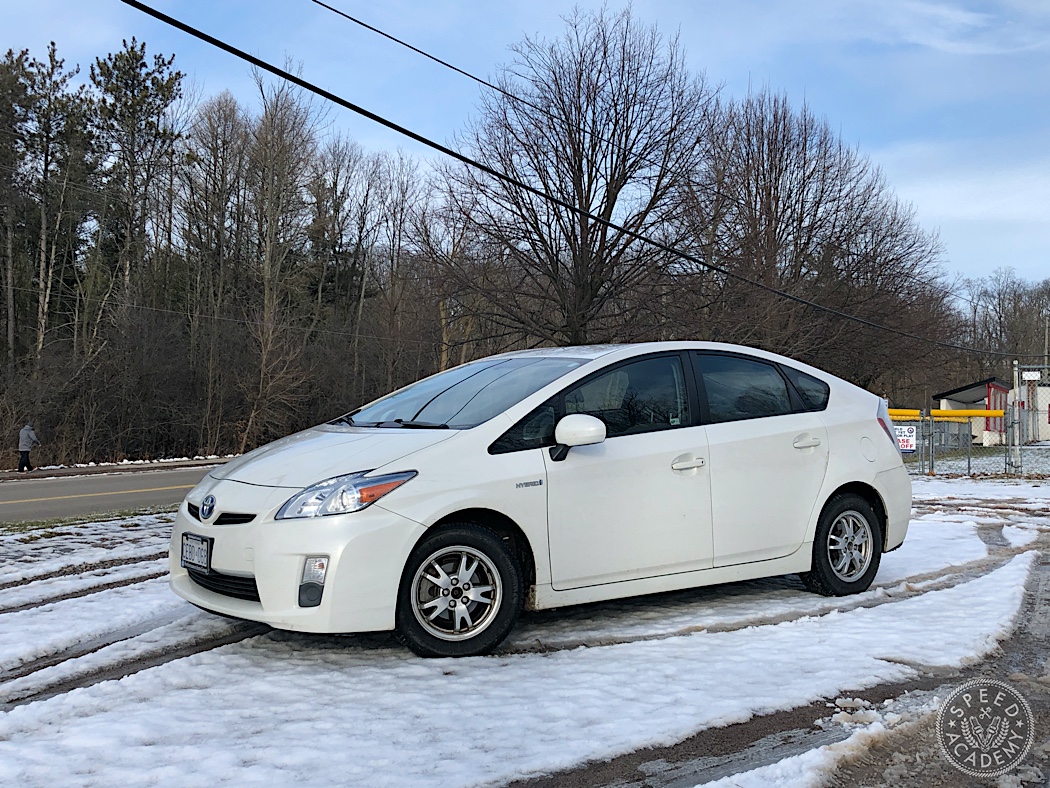
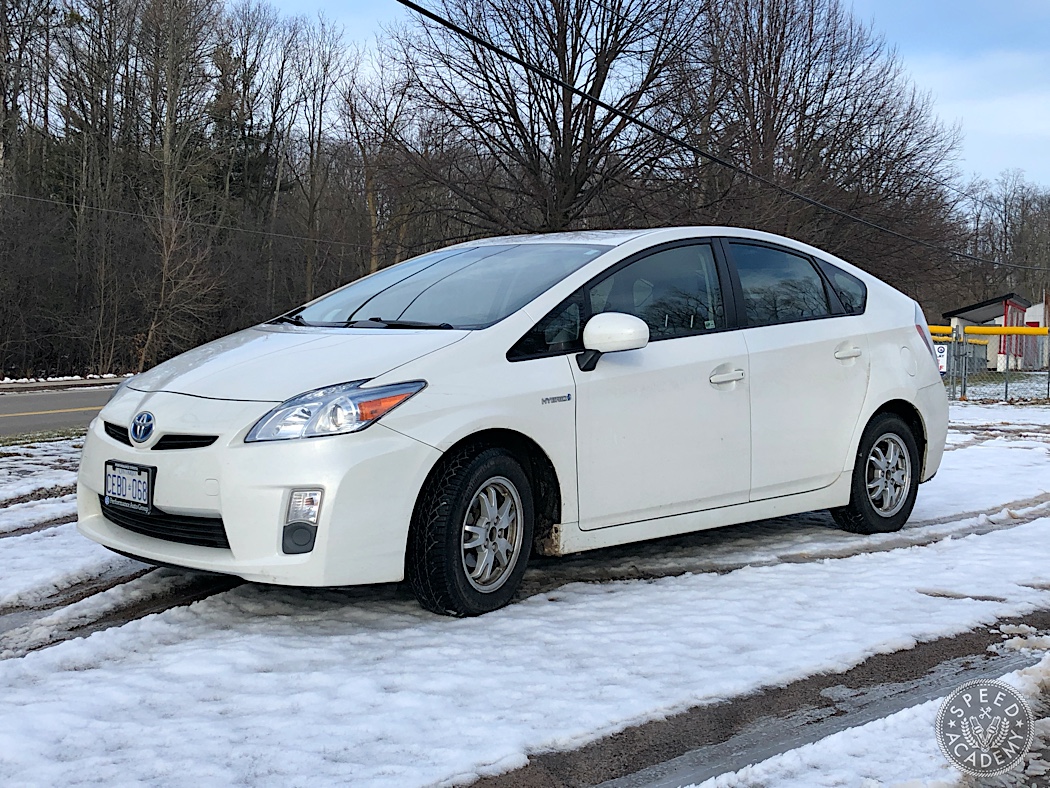
And as I learned yet again while doing some winter driving in my wife’s Toyota Prius, the same holds true for old winter tires vs new winter tires. That’s because part of the way winter tires generate grip is by using a soft compound that remains soft and flexible (and thus able to grip the road) in sub-zero temperatures, but this also means they tend to wear rather rapidly if you do a lot of dry road driving on them, especially in warmer conditions (where they can overheat and rapidly degrade).

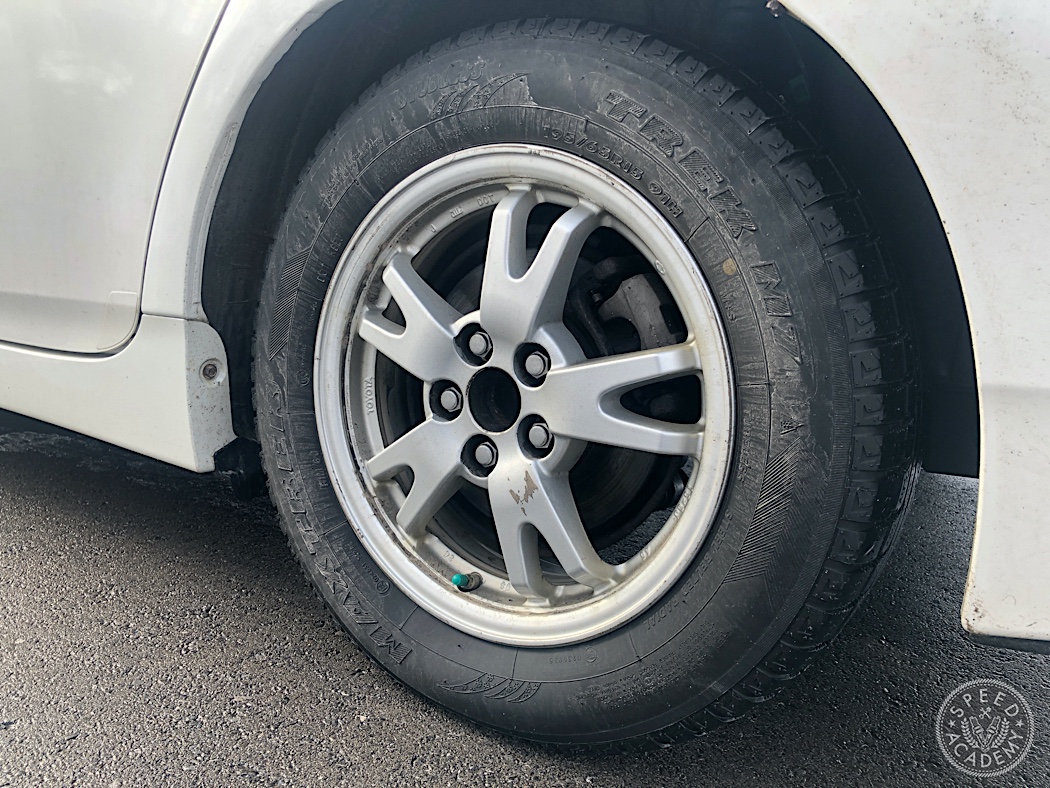
As you can see from this close-up, the old winter tires on the Prius are pretty badly worn, especially on the inner shoulder where the winter-specific sipes in the tread blocks are almost worn off. Not a good scenario for driving on slippery surfaces, as I learned while trying to drive the car up our steep, snow-covered driveway, only to spin the tires and slip back down the hill towards the road. Clearly it was time for some fresh winter rubber.

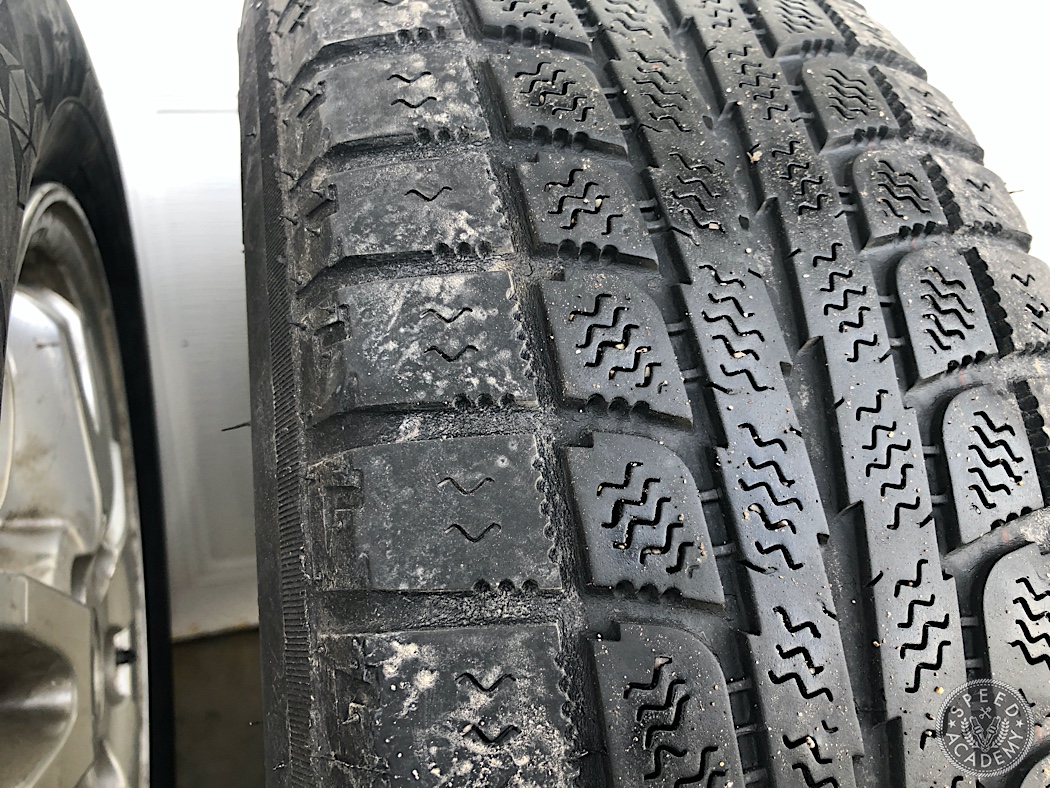
More than just a case of visible wear, though, I’ve also found that with low-buck winter tires like these, the compound hardens and loses much of its cold weather grip after just a season or two of use, plus they were like driving on water balloons, the very soft sidewalls and poorly supported tread blocks slowing the car’s handling response to drunken manatee swimming in a bowl of Jello levels (and I’m not even exaggerating). So even though I saved money on the initial purchase of these el cheapo winter tires, because I only got 2 winters out of them (and their performance was noticeably degraded after just a single winter), I would have been much better off spending twice as much on a high-quality set of winter tires that will last twice as long and deliver much better overall driving characteristics in all types of conditions. It’s just the smart thing to do, so I decided to be smart instead of cheap this time around!

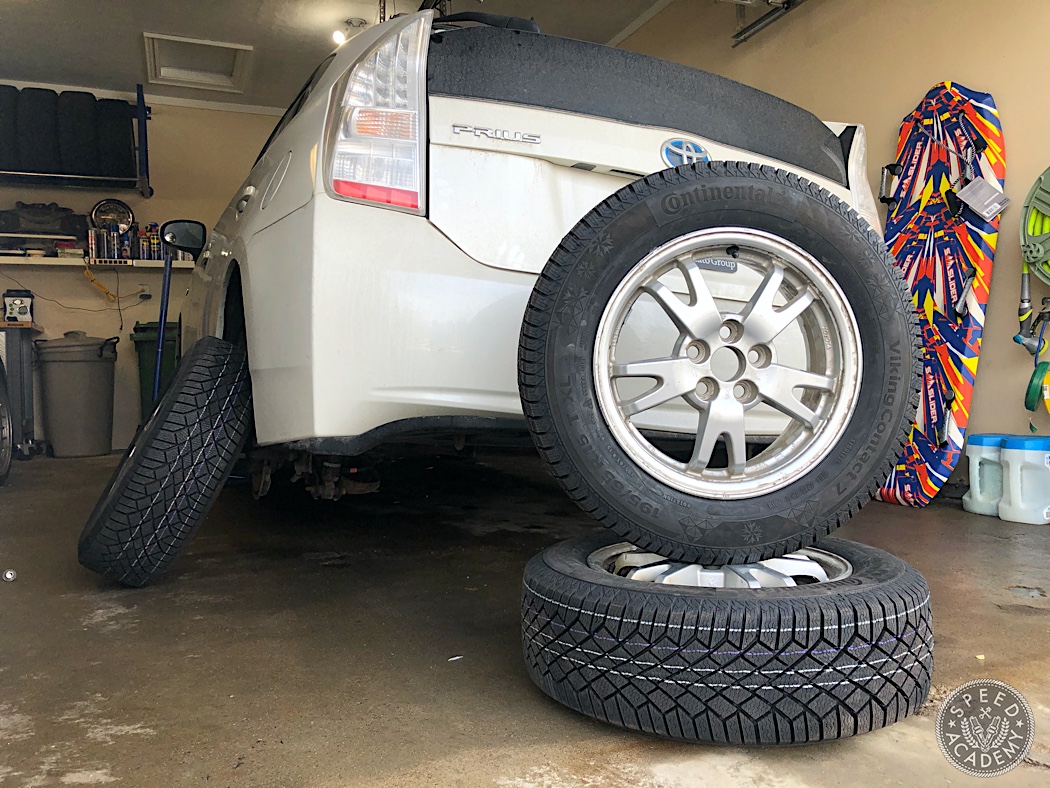
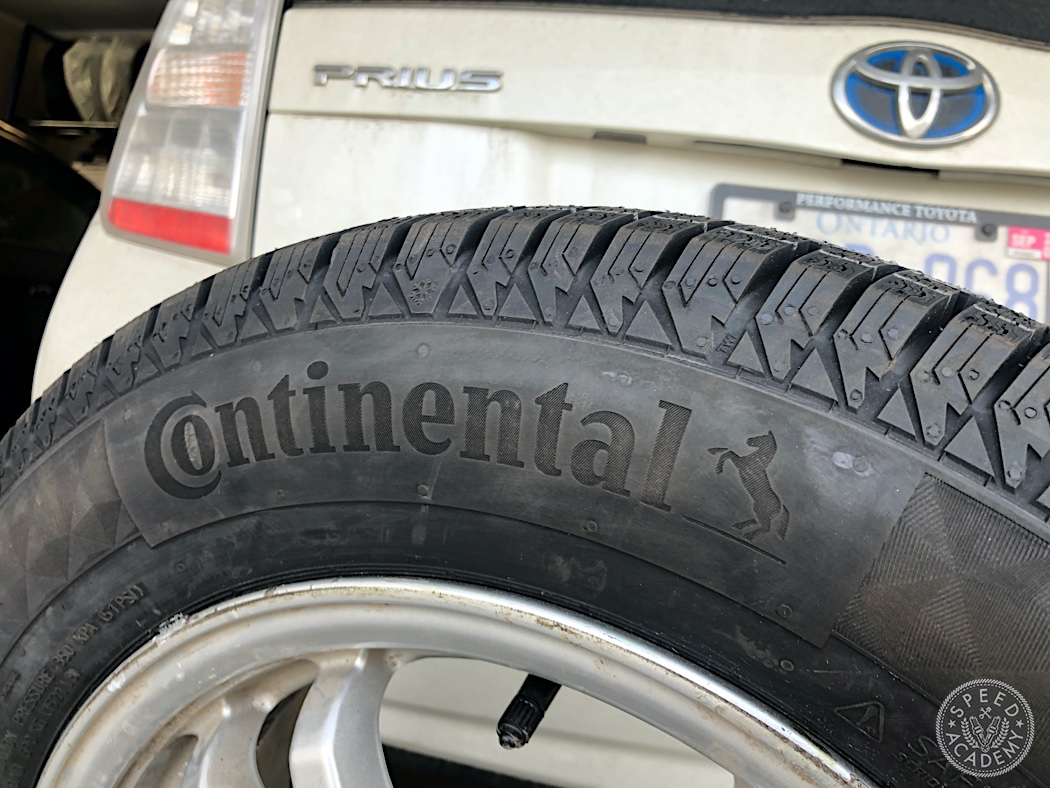
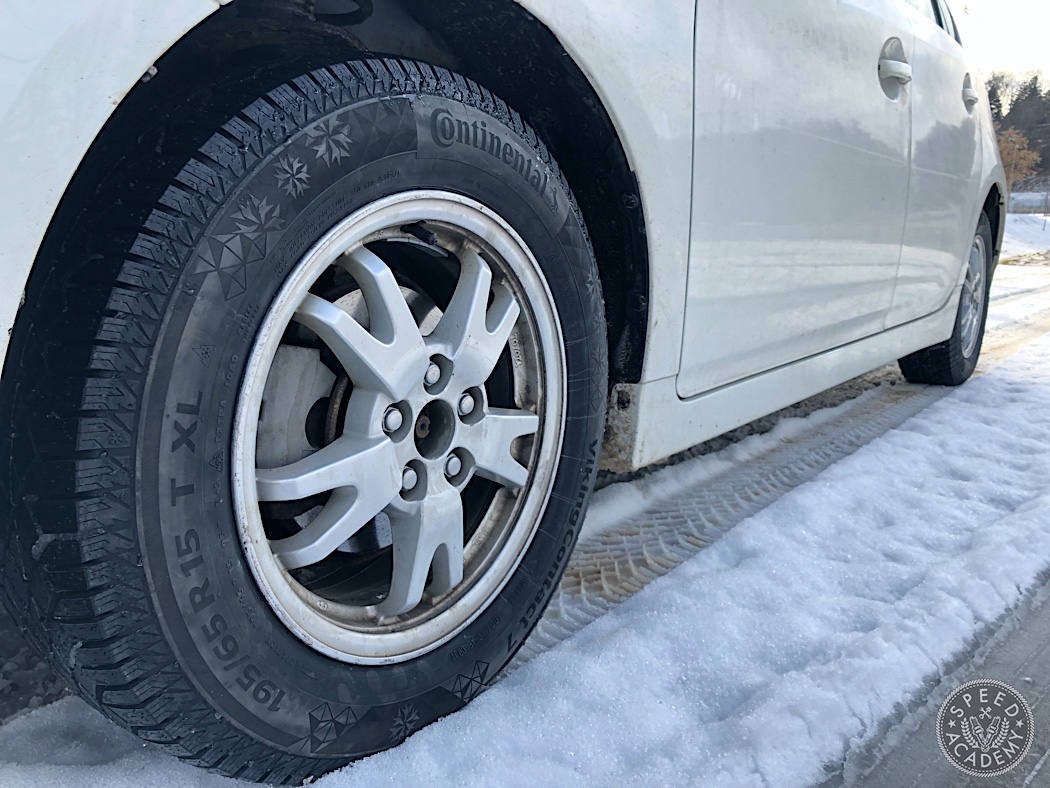
To do exactly that, I turned to Continental Tire and their VikingContact 7, a new winter tire offering from a company that has long been a leader in wet and cold weather tire performance. And at $85.99 per tire (in a 195/65R15) at TireRack.com, they’re hardly what I’d call expensive, especially when you consider how important winter tires are if you live in a true four season climate like I do.

Source: alltyretests.com

Source: alltyretests.com

Source: alltyretests.com

Source: alltyretests.com

I chose this tire after having done some research online, having been especially impressed by its rankings for snow and ice handling, braking and traction, all areas I was looking for a major upgrade in versus the off-brand tires being replaced. In fact, in this alltyretests.com review, the VikingContact 7 ranked 1st in a bunch of important categories against the top names in the winter tire business, including snow handling and traction, ice handling and traction, as well as ranking 1st for noise level and ranking highly for dry handling and braking (and we do get our fair share of cold but dry winter days here).

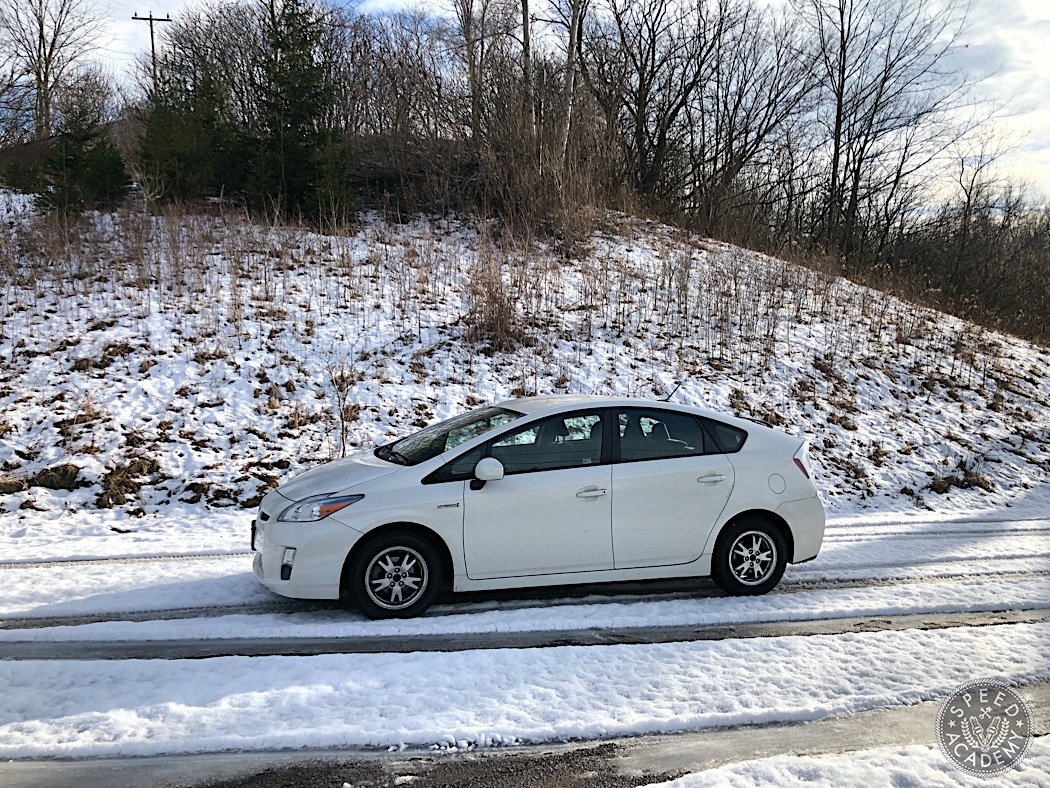
Having swapped the VikingContact 7’s onto the Prius and tested it on dry, wet, slushy and snowy road surfaces, I can tell you that the car is utterly transformed in every measurable way.

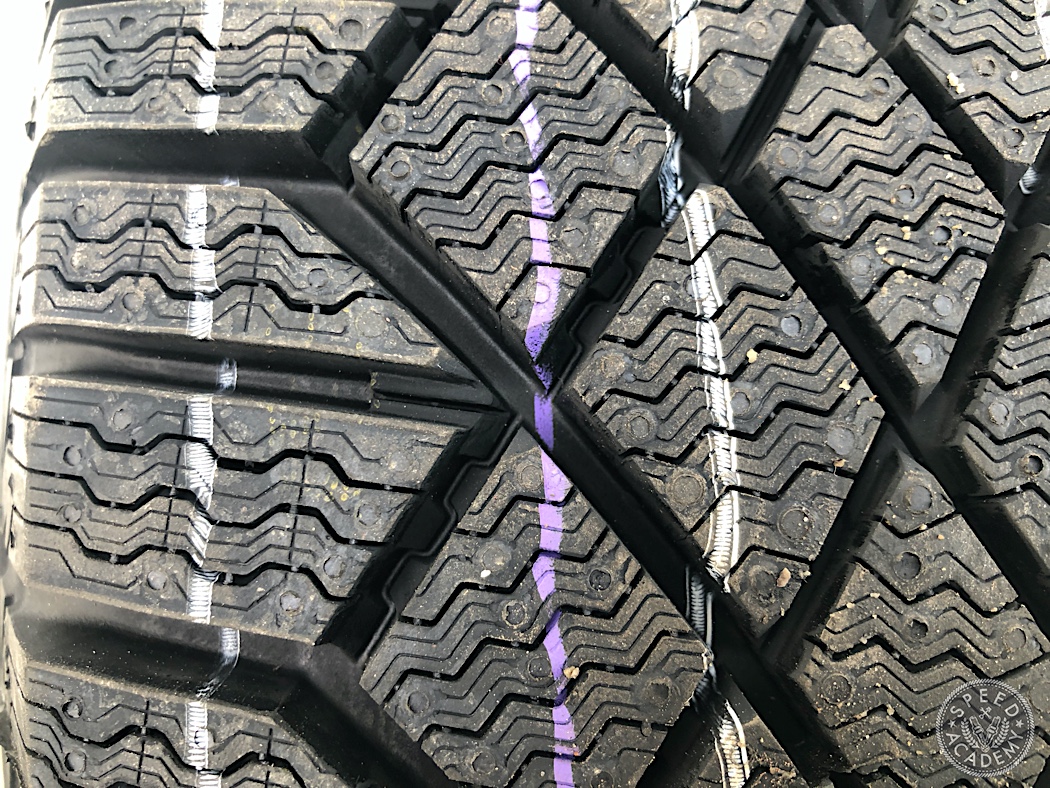
The first thing I noticed is that the car suddenly felt much more responsive to all driving inputs, especially steering input response which has gone from slow and vague to quick and precise thanks to the vastly superior sidewall characteristics of these Continentals, plus the VikingContact 7’s feature interlocking tread block bridges that tie some blocks together and greatly reduce tread squirm and the mushy and vague steering feel that comes with it.

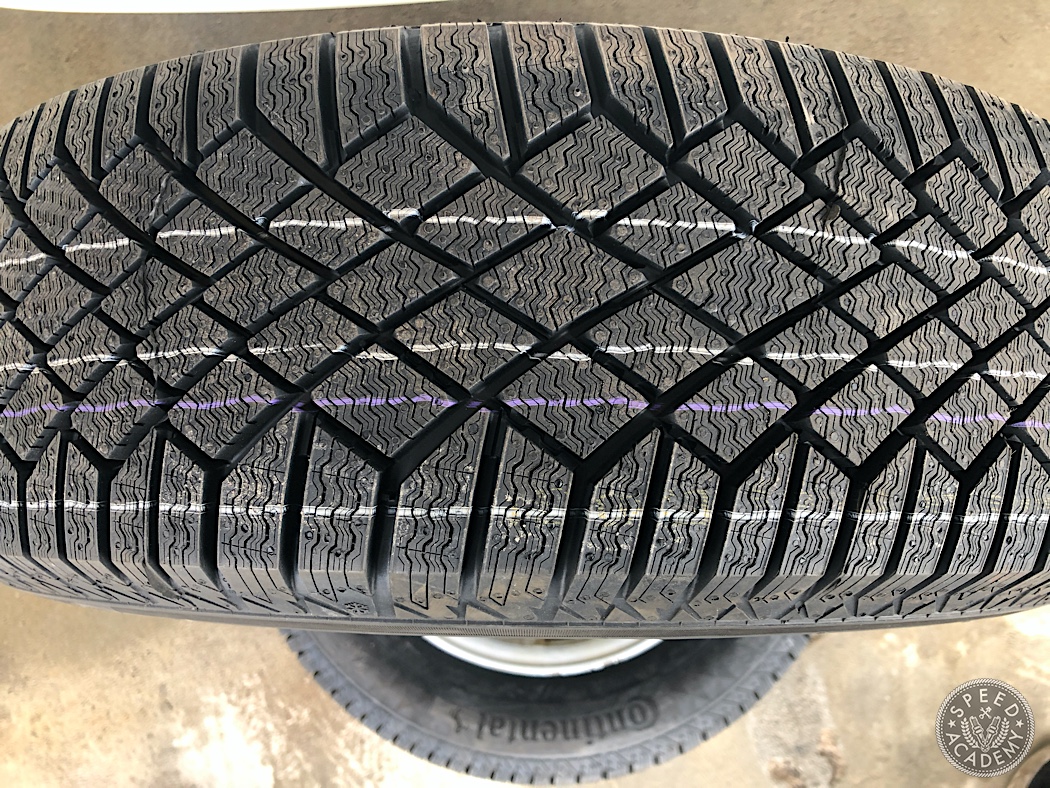
As you can see above, the VikingContact 7 also has a highly engineered network of 3D sipes and grooves, giving the tire an exceptional amount of biting edges for outstanding traction on slushy, snowy or icy surfaces. You’d think a tire with this many sipes and grooves and tread blocks would be noisy, and that is true of many winter tires, but not the VikingContact 7. These tires are remarkably quiet and smooth rolling down the road, so much so that it was eerily quiet inside the Prius compared to the old el cheapo winters that would howl like wounded animals at speeds over 60 kph or 40 mph.

The VikingContact 7 also uses Continental’s Nordic tread compound, which is comprised of active silica for outstanding grip in the wet. The compound also includes rapeseed oil additive that keeps the tread compound flexible in extreme cold conditions, and we do see our fair share of -20C and colder temps here between December and February. Plus the directional tread pattern also does an excellent job of evacuating water and slush from the contact patch, since the car always felt stuck to the road even through the sloppiest of slush and wet snow.

Considering the rapid pace of advancement we’ve seen in the ultra-high performance summer tire category, it should come as no surprise that serious advancements are taking place in the winter tire category, too. Still, I have to admit I wasn’t expecting this big a leap forward in winter weather performance, even when compared to el cheapo winters like I had on the car before. If you’re in need of new winter tires and are looking for class-leading snow and ice traction and handling as well as superb dry handling and low road noise, I wholeheartedly recommend putting the VikingContact 7 at the top of your shopping list.

LINK: Continental Tire VikingContact 7

Beware of Counterfeit AEM Performance Electronics Products!

$
0
0

We recently received this e-mail from our friends at AEM Performance Electronics and wanted to share it with our readers because we use a lot of AEM products on our builds and have always found them to deliver top notch performance and reliability and we’d hate for any of you to have a different experience simply because you unknowingly bought a counterfeit product. If you’re thinking of buying any of the products listed below, please give this a read and protect yourself against low quality knock-offs.

PRESS RELEASE:

BUYERS BEWARE – PURCHASE FROM AUTHORIZED AEM PERFORMANCE ELECTRONICS DEALERS TO AVOID COUNTERFEIT PRODUCTS

We have identified certain AEM Performance Electronics products that were counterfeited and are being sold. We obtained counterfeit samples of the products listed below. The samples we received arrived in either non-functioning condition or performed well below safe performance standards.

The counterfeited products we have identified are:

  • Digital Wideband Gauge, PN: 30-4110
  • Adjustable Fuel Pressure Regulator, PN: 25-302BK
  • High Flow Fuel Pump, E85 Compatible, PN: 50-1200
  • High Flow Fuel Pump, E85 Compatible, PN: 50-1005
  • F/IC Fuel Ignition Controller, PN: 30-1910 (Discontinued 1/7/2019)
  • F/IC Fuel Ignition Controller, PN: 30-1911 (Discontinued 2/18/2019)
  • Adjustable Cam Gear, PN: 23-802BK

DO NOT BUY FROM THESE SELLERS

We have created a list of the online stores and companies who are selling COUNTERFEIT AEM Performance Electronics Products that you can download Here. Some of the product listings have been removed, but links are still live for their stores.

Counterfeiting is a serious crime, and more importantly, counterfeit products pose a grave risk to our customers due to inferior design, construction and use of materials. We do not want to see anyone’s life put at risk which is why we are publishing this list of known sellers of COUNTERFEIT AEM Performance Electronics products.

PURCHASE FROM AN AUTHORIZED AEM PERFORMANCE ELECTRONICS DEALER

The best way to avoid the purchase of COUNTERFEIT AEM Performance Electronics products is to purchase from an authorized online AEM Dealer and/or reputable performance products installer. We provide a Dealer Finder on our website and urge you to verify that the reseller from whom you are making your purchase is included on that list. Pay special attention to 3rd party sellers on popular auction sites and make sure they are authorized dealers before purchasing.

If you are a dealer who purchases AEM Performance Electronics from an Authorized Warehouse Distributor and would like to be added to our Authorized Dealer list, we welcome you to contact us by clicking Here. A member of our sales team will verify your information and contact you.

IDENTIFYING COUNTERFEIT PRODUCTS

Avoid Ultra-low Prices. “If it sounds too good to be true, it is”. The easiest way to identify counterfeit products is if it has a very low price. In many cases, pricing that is much lower than advertised prices from Authorized Dealers is an indicator that a product is counterfeit, as are special discounts that are added to significantly lower the price of a product.

Do Your Homework on Merchants. Just because a website looks professional it does not mean that it is run by a professional business. Research the merchant you are considering through reviews and the Better Business Bureau, review their About and FAQ page for inconsistencies and check to see if they have an acceptable return policy.

When purchasing from an auction site or third-party seller, it is highly recommended to look for contact details within the listing (email, phone number, physical address) or confirm that the auction site or third-party seller can be crosslinked to a brick and mortar location that has a traditional website. These steps will help to ensure that are purchasing from a reputable seller and that you can communicate with them for product support or order/shipping details. Again, the best way to ensure a positive experience is by purchasing through an Authorized Dealer.

Take an Educated Approach. In some cases, the price of a counterfeit product may be only slightly lower than the price of a legitimate product. By comparing prices from reputable authorized dealers, consumers can best determine the fair market value of a legitimate product vs. a counterfeit one. Fair market prices tend to be relatively consistent for a variety of reasons, including the inherent value of a legitimate product derived from quality engineering, the use of quality materials and manufacturing processes, and the reseller’s ability to provide the best possible service.

Additional Resources:

Consumer Reports – How to Spot Counterfeits

International Anti-Counterfeiting Coalition – Don’t Be Duped Into Buying Fakes

U.S Customs and Border Protection – Fake Goods, Real Dangers

Mazda RX-7 13B-REW Rotary Engine Build: Part 1 Engine Teardown

$
0
0

Thanks to the generous support of the original motor oil company, Valvoline, we’ve begun a 4-part video series documenting how to disassemble and rebuild the engine out of our JDM 1993 Mazda RX-7. This two-rotor sequentially turbocharged Wankel engine is a masterpiece of Japanese engineering and surely one of the most unique engine designs of all-time.

We are huge rotary engine fans, as evidenced by this ‘How Rotary Engines Works‘ story we posted 5 years ago, shortly after we started Speed Academy. So we’re very excited to be building our own 13B-REW rotary engine with our long-time friend and rotary engine builder Joe Ferguson from RPM Motorsports.

As you’ll see below, in Part 1 of this video series we start the process by fully disassembling the engine and discover some not-so-good surprises along the way. Stay tuned for Part 2 next week, where we’ll show you our rebuild plan and get to work on clearancing the side seals and apex seals.


Mazda RX-7 13B-REW Rotary Engine Build: Part 2 Porting & Seal Clearancing

$
0
0

In Part 2 of this 4-part rotary engine build video series, sponsored by Valvoline, Joe from RPM Motorsports shows us the technique required to properly street port the irons on our 13B-REW 2-rotor engine out of our 1993 Mazda RX-7. He also shows us the delicate and time-consuming process of clearancing the side seals to the very tight tolerances required to make good compression with a rotary engine, and he also shows us the similarly tricky process of clearancing the I-Rotary apex seals and Atkins corner seals.

Be sure to check out the video below for all the details and check out Episode 1 on our YouTube channel if you missed seeing us disassemble this fascinating piece of engine design and engineering.

Mazda RX-7 13B-REW Rotary Engine Build: Part 3 Completing The Shortblock

$
0
0

In Part 3 of our 4 part rotary engine build series sponsored by Valvoline, Joe Ferguson from RPM Motorsports completely assembles the 13B-REW shortblock destined for our 1993 Mazda RX-7, demonstrating how to properly “stack” the irons and housings, install the eccentric shaft, and install the Renesis 10:1 compression ratio rotors as well as the iRotary apex seals and springs.

It’s a truly unique process that has very little in common with assembling a piston engine, other than the necessity to check seals clearances like you would bearing clearances in a piston engine (although the process of checking those clearances is totally different, as you can see in Part 2 of the video series).

Once our rotary’s stack was completed, as you’ll see in the video below, Joe then tied the whole thing together using high-strength engine studs from Turblown Engineering. These studs are not only stronger than the OE bolts, but because of their design they also ensure a more accurate and reliable torque setting.

This episode wraps up with Joe installing a baffled and higher capacity oil pan from Xcessive Manufacturing that not only ensures a better supply of oil to the pickup, it’s heavy-duty cast aluminum construction also means it functions as an engine stiffener as well.

Stay tuned for Part 4 of this series, where Pete and I build out the longblock with a whole bunch of sexy go-fast parts.

Mazda RX-7 13B-REW Rotary Engine Build: Part 4 Completing The Longblock

$
0
0

In Part 4 of our 4 part rotary engine build series sponsored by Valvoline, which you can watch at the bottom of this post, Pete and I build out the longblock, the shortblock assembly having been finished by our rotary engine building guru Joe Ferguson from RPM Motorsports in Part 3 of the series.

We got things started by bolting up a SPEC Clutch Stage 2+ clutch disc and pressure plate, and we’ve had a lot of prior experience with the 2+ friction material, which uses Kevlar on one side for excellent street manners and a carbon semi-metallic material on the other side for increased torque capacity. In our experience, this clutch can take a ton of abuse at the track while still delivering easy engagement from a stop for street driving, and with a torque rating of 425 lb/ft it should be more than strong enough to handle the power we’re expecting from our 13B. Oh, and we also installed a SPEC lightweight aluminum flywheel, which weighs about half of the 20-lb OE flywheel, so will deliver snappier throttle response and quicker heel & toe rev-matching action.

Next we jumped to the intake side of the engine, bolting up an Xcessive Manufacturing lower intake manifold, which deletes a bunch of “rats nest” doodads including the ACV pump and EGR tube. This frees up a bunch of space to redesign the manifold for much better airflow, which should pay some serious dividends on our high compression, high revving 13B-REW setup.

Next we installed Radium Engineering’s beautifully made billet aluminum primary and secondary fuel rails, which have phenolic spacers and washers to prevent the rails (and thus the fuel) from absorbing heat directly from the engine. Plus we ordered up their ingenious ORB swivel banjo AN fittings so that we can route the fuel lines in any orientation we want.

Over on the exhaust side of the engine, we started off by installing Turblown Engineering‘s investment cast 347SS exhaust manifold, which is designed specifically to be paired with a Borg Warner internally wastegated EFR turbocharger. We opted for an EFR 7670, which is a smaller turbo than a lot of rotary guys would start with, but we’re targeting response rather than peak power and we think this setup will deliver the kind of super-quick transient response we’re after.

Thanks to feedback from Elliot at Turblown Engineering, we also upgraded the wastegate actuator to a Turbosmart GenV Twin Port Internal Wastegate Actuator that’s been specifically designed to suit EFR Series Turbochargers. This award-winning actuator improves boost response and control thanks to the larger working surface are of its diaphragm, plus its locking collar system means we can quickly and easily change out the base spring from 5psi all the way up to 26psi, and it’s true twin port control means we’ve got a wider boost control window, too.

That is a wrap on this engine build series, and we have to say a very big thank you to Valvoline for their support on this and for giving us the creative freedom to try something a little different with our “Original Motor Oil Moments” Sports Desk style promos in each episode.

We hope you enjoyed seeing this truly unique engine come together, and we encourage you to give Valvoline a try next time you’re looking for a high quality engine oil for your special project or your daily driver. We’ve been using Valvoline’s full line of products for many years now and have found everything they make to be extremely high quality, as evidenced by our Scion FR-S’s supercharged FA20 engine surviving (and winning) the Ontario-1500 week-long race event with Valvoline VR1 racing oil in its sump and Valvoline SynPower Full Synthetic gear oil in the transmission.

Quick and Easy 2016 Mazda 3 Build

$
0
0

That’s right, we take care of our friends in strange and special ways, including occasionally pimping their rides when they’re not looking. In the case of Moose, our long-time friend who you may have seen in a number of video series on our YouTube channel, he needed to borrow my Toyota Tundra for some manly work around his property and this gave us the perfect opportunity to sneak in a quick two day build on his daily driver, this 2016 Mazda 3.

Even bone stock I must say this is a really fun little hatchback to rip around in, but from our perspective every car can benefit from a little tasteful modification to improve on its performance and style. We’re pretty confident you’ll agree we hit the nail on the head with this build, the ST Suspensions coilovers deleting the wheel well gap above the  Enkei TS-V wheels and Nitto NT555 G2 tires while the carbon rear wing from J Spec Performance and urethane front lip providing a subtle but significant improvement in aggression. Add to that an AEM cold air intake for a few extra ponies and some much needed induction noise and a SprintBooster to tune out the laggy DBW throttle pedal and we think Moose has a damn near perfect Mazda 3 on his hands, but watch the two episodes below and judge for yourself.

Oh, and if you want to “trim your bushes so your tree stands taller” like Moose does with his Manscaped Lawnmower 3.0 hair timmer, be sure to use checkout code SPEED20 for a 20% discount!


Toyota Tundra Shop Truck Overhaul: Part 1 (Rust Wars Begin)

$
0
0

Thanks to the support of Continental Tire, we’re giving our much loved but often neglected 2008 Toyota Tundra SR-5 Double Cab shop truck a serious overhaul. With almost 300,000 km (or 185,000 miles) on the clock and 14 years of exposure to Ontario’s road salts, the old girl is long overdue for some attention.

In Part 1 of this 3 part video series, we dive right in and start the rust wars by removing the worn out front suspension (including frequent use of our handy-dandy Bolt Buster, a heat induction tool that works wonders on rusty and seized fasteners) and replacing it with Eibach’s Pro-Truck 2.0 coilovers and Dorman’s premium line of control arms and tie rod ends. Plus we refresh the brakes with Powerstop’s Z36 extreme truck & tow package, which includes powdercoated calipers, slotted and drilled rotors, and high-performance brake pads designed to deliver reliable stopping power while hauling and towing heavy loads.

The rear of the truck also got some much needed love in the form of new Dorman e-brake cables and pivot-bracket, Powerstop brakes, and Eibach Sport shock absorber.

The rust wars were real on this one, and you can be sure progress isn’t going to get any easier in the next episode. Click on the image below to go to Episode 1 of this knuckle-busting rustfest and don’t be afraid to Like & Subscribe to our YouTube channel while you’re there!

John “JC” Concialdi, Founder of AEM, Passes Away

$
0
0

John Peter Concialdi, affectionately known as “JC” by his family and friends, passed away at his home in Murrieta, CA on Sunday, June 18th. He was 67 years old. JC founded Advanced Engine Management (AEM) in 1987.

JC was a juggernaut in the automotive industry. He was an innovator whose product designs set standards for their performance and engineering. 

JC founded AEM after his time working at Weber, where he received the first-ever CARB EO for a performance carburetor. In his early days at AEM, JC tuned high-performance carburetors for all types of vehicles including off-road racers Carl Wells, Mickey Thompson, Spencer Lowe, and Rick and Roger Mears. John’s talent has brought some of the biggest names in the industry through AEM’s doors. His customers included Carroll Shelby, Phil Hill, Mickey Thompson, Stephan Papadakis, Bisi Ezeroiha, and many others.

As AEM grew and transitioned into manufacturing, his Cold Air Intakes set the standard for performance and design, making AEM the go-to brand in the import performance market. To solve the potential danger of hydrolock from the increased intake length common with cold air induction piping, JC created the air bypass valve, which received a patent. 

JC was instrumental in the co-development of the first plug & play engine management system for racecars, the Series 1 EMS. He designed and developed the first oil-free high-flow air filtration media for the automotive aftermarket (DryFlow). Prior to AEM’s sale of its hard parts division, John co-developed AEM’s OEM engineering and development division, which supplied performance products for several OEM vehicle manufacturers. JC also created and directed the fuel delivery arm of AEM, designing an affordable high-flow fuel pump line that is alcohol-compatible, before they were common in the market.

Lesser known was JC’s passion for philanthropy and helping others. John performed career guidance work for the Wounded Warrior Project, where he regularly met with wounded servicemen to expose them to opportunities in the automotive industry. He also lectured at high schools, colleges, and universities about working in the automotive technology sector. JC was a champion for the industry.

JC’s creativity and passion for creative solutions crossed into all types of motorsports. Many of the innovations that were created at AEM carried over to multiple segments of the industry. He was a true pioneer, and a champion of performance regardless of the application.

To those who knew JC personally, they will tell you that he was one of the most approachable, friendly, magnanimous men our industry has known. His enthusiasm for life was infectious. Through his friendships and mentoring, JC assisted countless racers not just with their racing programs, but with their life’s direction. He touched the lives of countless people. 

A Celebration of Life will be held in JC’s honor. Memorial contributions can be made in JC’s honor to the Wounded Warrior Project. 


Latest Images